Build NFT Marketplace using Thirdweb

Hi, I'm Aaron Rebelo, a MERN stack developer who's passionate about creating robust and engaging web applications. My expertise lies in using MongoDB, Express, React, and Node.js to build applications that are not only functional but also visually appealing.
In addition to my work as a developer, I'm currently learning Solidity, a programming language used for developing smart contracts on the Ethereum blockchain. I believe that blockchain technology is the future, and I'm excited to be a part of this emerging industry.
I'm also interested in digital marketing and believe that effective marketing strategies are key to the success of any project. That's why I'm committed to learning the latest marketing techniques and strategies to help my clients achieve their goals.
In my spare time, I've started a video series on my YouTube channel, @thedecadehypothesis, where I document my progress on building new habits every 10 days. I believe that building new habits is essential for personal growth, and I'm excited to share my journey with others.
Thank you for taking the time to learn more about me. I'm passionate about my work and excited about the opportunities that lie ahead. Please feel free to connect with me if you have any questions or if you're interested in working together.
Initial Setup
npx create-next-app beastQuest
npm i @thirdweb-dev/react @thirdweb-dev/sdk ethers@^5
The thirdweb-dev/react basically uses react queries under the hood, these queries wrap a functionality. You use them basically to read data from the blockchain.
For example, when minting a new NFT, queries that view information about NFTs are re-fetched to load the new NFT automatically.
import { useContractRead, useContract } from "@thirdweb-dev/react";

function App() {
  const { data: contract } = useContract("{{contract_address}}");
  const { data, isLoading, error } = useContractRead(contract, "functionName");//function name is what you want to call
}
Mutations are used to write data to the blockchain when a transaction is required.
They require a wallet to be connected, and by default, are executed from the currently connected wallet.
import { useContractWrite, useContract, Web3Button } from "@thirdweb-dev/react";

function App() {
  const { data: contract } = useContract("{{contract_address}}");
  const { mutateAsync, isLoading, error } = useContractWrite(
    contract,
    "functionName",//what you want to call
  );
}
Moving on, we have to specify the provider, i.e specify the network your smart contracts are deployed to in the desiredChainId prop and wrap your application
import { ChainId, ThirdwebProvider } from "@thirdweb-dev/react";

const App = () => {
  return (
    <ThirdwebProvider desiredChainId={ChainId.Mumbai}>
      <YourApp />
    </ThirdwebProvider>
  );
};
The above says that your application will be using the Mumbai network.
Connecting Wallets
There are two ways you can enable user’s to connect their wallet with your application:
Using the Connect Wallet Button component, for a pre-built approach.
Using the wallet connection hooks, for a customizable approach.
Both involve a two-step process, first to declare the supported wallets in the ThirdwebProvider component, and then prompt the user to connect, either with the UI component or a hook.
you can read more about it here.
Getting some fake TOKEN (MATIC)
get some fake matic tokens here (This faucet transfers TestToken on Matic testnets and parent chain). The working test chain that we'll be using is Mumbai. MATIC is used for gas fees.
Create and Deploy marketplace contract
Now that I've spent weeks learning about solidity, I come across this click-and-click website where I can easily create a contract without much effort.
Here is the link to the dashboard "ThirdWeb Dashboard".
Connect your wallet, and if you just want to test it out. you can deploy them on the testnet as well.
Thirdweb allows you to deploy on any EVM compatible blockchain.
Let's go ahead with an NFT DROP.

An NFT drop is an ERC721. a user can claim these NFT's, as long as they fulfill certain conditions.
After you follow the steps, deploy this contract. The contract will be deployed against your metamask /wallet address.

Click the Deploy button.
On clicking the deploy button, we can fill in the details about your contract
such as Name, Symbol, and set a collection Image, description, and royalties if required. you can also set the recipient address, that is, your address who will receive the royalties. lastly, select any EVM contract you wish to deploy your contract to. Finally, click the Deploy Now button to deploy the contract.
After you publish your contract you'll see your contract dashboard with all your contract info.
Now let's single upload or batch upload our images. by clicking this button
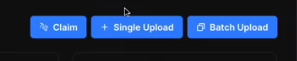
after that add your name, description and properties (triats) and values. after that you can click a lazy mint NFT, so others can claim. what I mean by lazy mint is the NFT is owned by our contract itself.
Now here is the deal, no one can claim the NFTs from our smart contract yet. why? because you havent set the mint conditions.
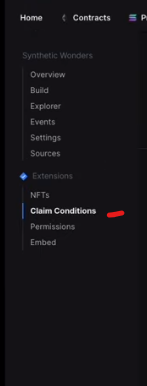
Under the left hand side, click on the claim conditions to set it up.
Click add phase and fill in the details

now that's done, people can claim the NFTs.
Now let's go onto the build section and see how to use that in our front end.
You possess the code snippet for pretty much anything right now.
Setting up the front-end
Now let's deal with the front end.
npx thirdweb create app
follow and fill in the instruction as per your needs

move into your directory. I'll be using chakraUI as my UI library.(so npm that)
now since you've made changes to the normal flow, you'll have to make small changes. in the pages/_app.js file
comment the import "../styles/globals.css" line of code and add import {ChakraProvider} from "@chakra-ui/react"
Scroll a bit down and wrap your component with the ChakraProvider

Dont forget to comment the styles line fomr index.js. delete the boiler plate code and code your own. Go through the documentation to add your connect button by importing <ConnectWallet/> form @thirdweb-dev/react. run the node and see how it looks.
Now lets get to the main details. First we'll have to create variables for out ContractAddress. The cool thing about thirdweb is we dont have to write our abi/metadata in a seperate file and later call them. we can just use one of the react hooks provided by thirdweb
const contractAddress = "0xabc..124.Z";

const {contract} = useContract(contractAddress); //we have the contract as a variable
const {data: metadata,isLoading:isLoadingMetadata} = useMetadata(contract);

const {data: totalMinted, isLoading: isLoadingTotalMinted} = useContractRead(contract, "functionName");

const address = useAddress(); //gonna tell you if you are connected or not...


...

<Web3Button
    contractAddress={contractAddress}
    action={(contract)=>contract.erc721.claim(quantityToClaim)}
> Claim
</WebButton>
click here to read the documentation to know how to import images from thirdweb "This is how we import images"
you might probably be wondering what are my read and write functions from the smart contract. Dont worry, thirdweb has got you covered. If you click the explorer button on the left you'll get a list of read and write functions.

I think by now you've got the basics down. that should be more than enough to play around with it.
Deploy on vercel
Dont worry i've got you covered. I'll run through the process of uploading on vercel
npm i -g vercel
vercel
after that, It'll run you through some prompts. if you want to deploy, or is this an existing project. After this quick setup, you'll have a ready to run website on vercel.
you'll get a URL showing your website.
Thanks for reading. I hope you enjoyed reading and learning as much as I did :)
Cheers!


